


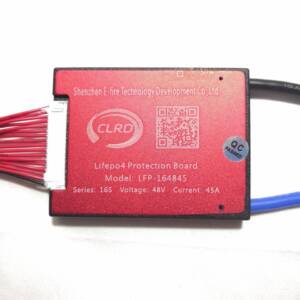
3S BMS 12.6V 40A, protective board with balanced charge
Price – 12BGN. per item including VAT
BMS PCB boards for battery type 18650, overcurrent protection, overcharge protection, short circuit, output and charging current limitation.
and balanced (balanced) cell-by-cell charging.
3S BMS 40A 11.1V – 12.6V
WIRING DIAGRAM: See photo after description
and balanced (balanced) cell-by-cell charging.
3S BMS 40A 11.1V – 12.6V
WIRING DIAGRAM: See photo after description
Battery management system 3S BMS (Battery management system)
SPECIFICATION:
40A 12.6V protective board with balanced charging series
Charging voltage: 12.6V – 13.6V (BMS 9 – 11.1 – 12.6V) – the cells are charged up to 4.2V per cell (12.6V per pack);
Cell overdischarge protection – 3V per cell or 9V for the entire pack;
Continuous operating discharge current (upper limit): 40A (if there is no good cooling, it is good to reduce the current consumption)
Continuous operating charging current (upper limit): 20A
Self-recovery function (recovery function – AUTO Recovery);
100 mA balance current;
Anti-interference function;
Size: 42*60*3.4mm
Weight: 9.8 r
For all applications, including aluminum ones: screwdriver, electric screwdriver, angle grinder, flex, vacuum cleaner, saw, saw, zege, and so called.
For cells with a nominal voltage of 3.6V, 3.7V (2.5 – 4.2V) Lithium batteries (incl 18650, 26650, lithium polymer batteries, Lithium ion batteries, li-ion, lion, li ion, Li-Po, Lipo, Li Po)
Follow the indicated voltage outputs exactly: 0V, 4.2V, 8.4V, 12.6V and don't cut it short!
For cells with a nominal voltage of 3.6V, 3.7V (2.5 – 4.2V) Lithium batteries (incl 18650, 26650, lithium polymer batteries, Lithium ion batteries, li-ion, lion, li ion, Li-Po, Lipo, Li Po)
Follow the indicated voltage outputs exactly: 0V, 4.2V, 8.4V, 12.6V and don't cut it short!
See the connection diagram of the photos below
The board is suitable for applications with starting current lower than 80A (170W starting power);
Note 1: For normal use of a screwdriver or other similar device, lithium-ion elements must be used 18650 with peak cell current 20 – 30A (for batteries with total 3 element) or 10 – 15A (for batteries with 6 element). Low-discharge batteries for flashlights or from a laptop hardly work for such applications!
Note 2: While the battery is charging, the “430” resistor glows because the board balances; If the heating continues for some time after the charge is stopped, check that the cables are connected properly or that there is no damaged cell in the battery.
Note 3: When making a battery of 3 series, it is good that the individual elements are at the same voltage (equally charged / diluted). If they are not - load them separately and then use them in batches. To check the condition of the battery - if the voltage of a given / certain series fall faster, it is weak in these series / damaged battery. It is not good to mix old or weak, or different battery models together! The state of the assembled battery is relatively equal to the state of the weakest element in it! When a brush motor is used, optional, you can connect a non-polar capacitor (for over 25V, capacitance 10uF-100uF) to + and - on the engine, to prevent reverse spike from the motor. Break the MOS tube
IN PROBLEMS WITH THE BOARD, AS WELL AS FOR REPAIR AND TESTING / BMS PROBLEMS AND TECHNICAL TESTING:
Symptom: Do not start the drill or stop it (PICTURE TEST 1 / PHOTO TEST 1)
Poor battery output or excessive motor power causes this type of phenomenon
Solution:
1) Replace ordinary lithium battery with power lithium battery, discharge capacity 15C20C 2) 3S 40A: Change 3 series battery to 3 string 2 or 3 string 3 4S 40A: Change 4 string battery to 4 string 2 or 4 string 3 3) Disconnect the battery first, and then remove the triode in the blue circle. If the power is removed, ensure that the other components are not touched during the removal.Failure phenomenon: Can not charge, can not discharge, the output
voltage is lower than the battery pack (PICTURE TEST 2 / PHOTO TEST 2)
1) Use a multimeter to measure the voltage of each battery:
– Black pen to 0V solder joint, red pen to 4.2V solder joint, normal voltage 3-4.2V
– Black pen to 4.2V solder joint, red pen to 8.4V solder joint, normal voltage 3-4.2V
– Black pen to 8.4V solder joint, red pen to 12.6V solder joint, normal voltage 3-4.2V
3-4.2V
– The negative voltage is measured, indicating that the wrong line is being used and
the protection board may be permanently damaged.
2) If the measured voltage is in the normal range, first charge for one minute, then
discharge for one minute, measure the output voltage
3) If the output is still abnormal, measure the voltage of the CD and FD pads
– Use the multimeter’s black pen to connect the 0V solder joint, and the red pen to
the CD solder joint. If the voltage is lower than 7V, it means that the charging MOS
(blue circle) is broken down by one of the static electricity, and one of the bad
spots will work properly.
– Use the multimeter’s black pen to connect the 0V solder joint and the red pen to
the CD solder joint. If the voltage is lower than 7V, it means that the charging MOS
(blue circle) is broken down by one of the static electricity, and one of the bad
spots will work properly

Reviews
There are no reviews yet.